Water, water, everywhere,
And all the boards did shrink;
Water, water, everywhere,
Nor any drop to drink.
From The Ancient Mariner
November, 2018
The Ancient Mariner had to haul his own water, but thanks to modern technology, we can now convert salt water to fresh water on a sailboat. To me, a watermaker is freedom. Freedom to cruise for extended periods of time without having to worry about pulling into a marina or fuel dock for water. Freedom to take showers and rinse salt off of the boat and equipment without worrying about running out of water. Terrapin is a small catamaran with a modest capacity water tank of 47 gallons. This means that a full tank of water will last the two of us about 3 days of conservative water use: dishes, short showers, stern shower rinse after swimming. Why not carry extra jerry cans of water lashed to the stanchions? In a word, weight. At about 8.3 pounds per gallon, we would have to carry about 370 pounds of water just to double our capacity, not to mention having 6 jerry cans tied around the deck. Catamaran performance is seriously impacted by weight and 370 pounds is a lot. Then there is the fun of carrying around 50 pound jerry cans on the deck of a sailboat, and sometimes in and out of a dinghy. Finally, in some isolated areas as in the Bahamas or Caribbean good quality water is hard to come by. So, for a small boat, and in particular catamarans, watermakers make a lot of sense.
But then there is the issue of how to power it. The heart of a watermaker is a high pressure pump that can put out 800 psi of pressure, and then a low pressure pump to supply sea water to the high pressure pump. Both of these pumps draw a lot of power. There are two flavors of watermakers: AC and DC. AC watermakers can put out more capacity in terms of gallons per hour, but draw more power. This AC power generally has to be provided by an on board generator. DC watermakers use less power but don’t put out as much capacity. The advantage of the DC watermaker is that they can be powered by solar if you have sufficient solar capacity.
Terrapin has 140 watts of solar, not enough to power a high output DC watermaker and it would be difficult to add more solar (although I am still considering it). We do however carry a Honda EU2000 suitcase generator that fits in the stern locker. This generator can power an AC watermaker. Watermakers are also noisy and I wanted the highest capacity possible to limit run time. In terms of capacity, AC watermakers win hands-down.
My choice:
Cruise RO makes highly rated AC watermakers, the most popular of which can be powered by the Honda 2000 generator and puts out 30 gallons per hour. Most comparable DC watermakers put out less than half that much. The other strong selling point for the Cruise RO is that it is made up of readily available pumps and filters so when components inevitably need replacing, they are easier to source and less expensive. Finally, the owner of the company, Rich Boren has earned a reputation for outstanding customer service. At about $6,000, this is not a decision to make lightly and I believe I did my homework.
How they work:
Most watermakers are modular and require custom, permanent installation on the boat, although one that I considered, the Rainman, is portable and self contained in two suitcases. The heart of the watermaker is the reverse osmosis membrane. This membrane basically filters out the Na+ and Cl- ions and anything else out of salt water and only allows H2O to pass through. Of course to do this, the water has to be under tremendous pressure (800 psi) to force it through the membrane. This is accomplished with a high pressure pump. The membranes are rolled up in a 4’ tube capable of withstanding this pressure. The number of tubes dictates how much fresh water can be produced. My Cruise RO has two pressure vessels. The high pressure pump needs to be supplied a continuous supply of clean seawater, and this is accomplished with a low pressure pump and some pre-filters. All of this is attached together with a bunch of tubing and valves. On top of all this, some watermakers add in electronics and sensors to make it all run automatically and shut off when done. This greatly increases the cost and adds to the complexity, which means less reliability. In my opinion, watermakers are not a “set and forget” device and should be monitored while operating. With two high wattage pumps and 800 psi of pressure, what could possibly go wrong? The cruise RO has an electronic option, but I did not go with it and Rich does not even recommend it for most people.
My installation:
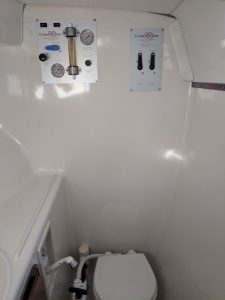
The biggest decision is where to locate the various components on the boat. I chose the head (forward in the starboard hull of the PDQ 32) to locate the valve panel as there is a large flat bulkhead to mount the panel. Furthermore, behind the panel is the forward bow locker with enough space for all the tubing, pre-filters and pumps. I chose to locate the high pressure vessels under the forward settee in the salon. This will allow easy removal when the filters eventually need replacing. Another decision to make is how to supply the watermaker with a supply of sea water. This requires a thru-hull below the waterline. The PDQ 32 has a thru hull in the forward bow locker, but it was supplying sea water to the head, a common Jabsco head with a manual pump. The watermaker requires a dedicated through hull and I couldn’t simply put a tee in the line to supply water to both the head and the watermaker. But then I thought, why flush the toilet with sea water when I will have a good supply of fresh water? Sea water to flush the toilet is problematic in that the sea water itself in the bowl and lines begin to smell like sulfur if allowed to sit for any length of time, and sea water in the holding tank makes the smell all that much worse. My initial thought was to install a new electric head that flushes with fresh water. I may still do that, but for now, all we need to do is add fresh water from the sink to the bowl using a cup, and then pump the head like usual.
The hardest part of the installation was getting the courage to cut two 12” square openings in the bulkhead. After consulting some knowledgeable folk, the consensus was this would not appreciably compromise the structural integrity of the PDQ 32. So, I went ahead. It was a matter of carefully locating all the components to make sure they were in logical and accessible locations. Then I attached all the tubing, and wiring. All in all, it took me about 5 days, with the help of my very capable first mate. I think it would be rare for anyone to have no issues upon start up, and I had some issues, but nothing terribly serious. The first issue I had was getting the low pressure pump to prime and circulate water through the low pressure circuit. After a frustrating hour, I decided to call Rich Boren. I had read about his legendary customer service and was about to find out how true those testimonials were. I knew from reading some forums that he was on his boat in La Paz, Mexico, and was not particularly confident that I would be able to get ahold of him. Well, I was pleasantly surprised when he answered his phone. He walked me through priming the pump and a few other questions I had. I also had a few water leaks and he helped me trouble shoot those. I probably made 4-5 calls to Rich over the next few days getting everything dialed in. His legendary for customer service is well deserved in my opinion.

A pretty clean installation. All the tubing and filters are on the other side, but still accessible.

In operation; low pressure pump is at 10 psi, high pressure is at 800 psi and the flow meter reads 0.5 gal/min or 30 gal/hour.
I have now used the watermaker for a season in SW Florida and the Keys, refilling our water tank every 3-4 days. It has worked beautifully and produces very pure water that tastes great. I first start the Honda generator and plug it into the boats AC “shore power inlet”. If the house battery bank is discharged, they will suck up a lot of amperage from the generator, so I need to wait until the batteries are mostly charged before I turn on the watermaker. Once the system is able to route most of the generator output to the watermaker, I turn on the pumps, adjust the flow rate and then test the output using a TDS meter. It takes about a minute for the salinity to be reduced to the drinkable range, about 200ppm. At this point I divert the water to the ships water tank and let it run for until the tank is full, about an 1 ½ hours. During this time, the generator is also able to contribute significant charging to the battery bank in that critical window of 80-100% charge (more on battery charging in another post).
So, yes, the watermaker is definitely freedom. We no longer have to find a dock to tie up to in order to fill our tanks and, while we are always conservative with our water use, we no longer have to ration our water or feel guilty about taking a shower when out cruising.


